In this tutorial I will demonstrate how to run a Ethereum 2 validator within a kubernetes cluster. We use Prysm as Eth2 and openethereum as Eth1 client.
The most obvious things first. Although openethereum and Prysm offer a Docker image, both of them will tell you to use the native client. One reason could be the focus on the main goal: providing a stable and functional client. A second once could be the reason that you can’t use more than one client at a time. In fact, if you try to run two clients together it can damage the network and cost you Ether. This means that one of the big advantages of containers, the elasticity, is not applicable here. But if you want to do it just because you can or you enjoy the self healing of damaged pods while you drive around with your lambo you earned from staking Ether your are good to go.
I don’t want to give you a large introduction to the new Ethereum ecosystem, you can read all relevant infos on their website. However there are a few things you need to know before we start.
This tutorial was done within the Ethereum testnet. To be able to setup a validator you need 32 Ether. First you need a wallet which is able to connect to the testnet. I would recoment MetaMask. Make sure to select the gorli network. Afterwards you can get Ether for free from the görli foucet. Those Ether have no value, but can be used for testing.
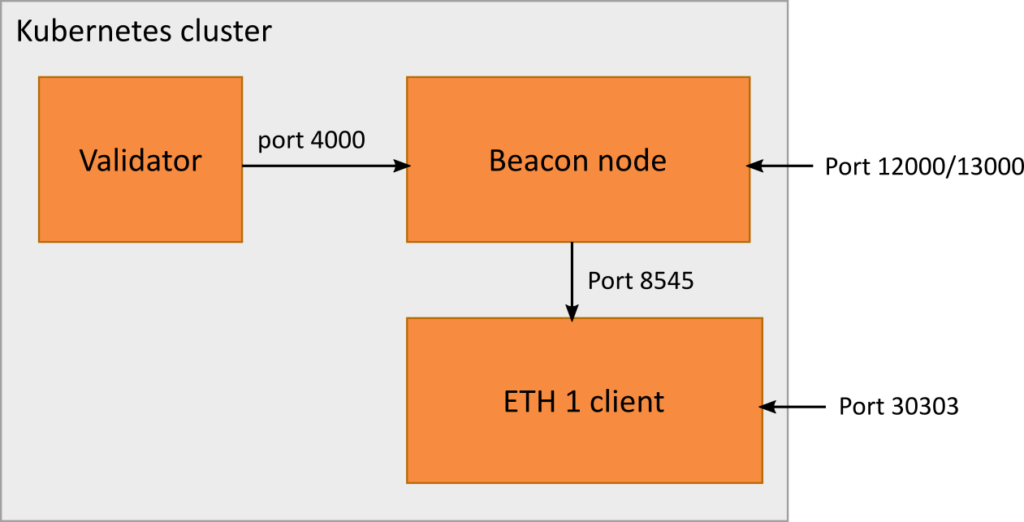
Its woth mentioning that Ethereum 2 isn’t a new system. Its more an overlay to Ethereum 1. The old Ethereum 1 blockchain will be a part of Ethereum 2. This means we have to install not only the Eth2 beacon node and the ETH 2 validator but also the traditional Eth1 client. At the end our cluster will look like this:
Setup the environment
If not already done, we have to install kubernetes. I used microk8s, but minikube is also a feasible choice. I used linux as the operating system. You can also use Windows, but I wan’t be able to support you with your setup. Installing kubernetes is often tricky but there are many tutorials out there that will help you.
We also need some permanent storage for our clients. The chain synchronization can take several days. You don’t want to start all over again if you restart your deployment. To store the chain information we create a simple folder in my home directory.
mkdir ~/.local/share/k8s/eth/testnet/openethereum
mkdir ~/.local/share/k8s/eth/testnet/prysm/validator
mkdir ~/.local/share/k8s/eth/testnet/prysm/beacon
Installing the Ethereum 1 client
As I already mentioned, we will use openethereum as our Eth1 client. Feel free to use another client if you want to.
apiVersion: apps/v1
kind: Deployment
metadata:
  name: openethereum-deployment
  labels:
    app: openethereum
spec:
  selector:
    matchLabels:
      app: openethereum
  replicas: 1
  template:
    metadata:
      labels:
        app: openethereum
    spec:
      containers:
      - name: openethereum
        image: openethereum/openethereum:latest
        volumeMounts:
        - name: openethereum
          mountPath: /home/openethereum/.local/share/openethereum/
        ports:
        - containerPort: 30303
          protocol: UDP
        - containerPort: 30303
          protocol: TCP
        - containerPort: 8545
          protocol: TCP
        - containerPort: 8546
          protocol: TCP
        args:
        - --unsafe-expose
        #- --nat
        #- extip:127.0.0.1
        - --base-path
        - /home/openethereum/.local/share/openethereum
        - --chain
        - goerli
      volumes:
      - name: openethereum
        hostPath:
          path: /home/<YOUR_HOME_FOLDER>/.local/share/k8s/eth/testnet/openethereum
---
apiVersion: v1
kind: Service
metadata:
  name: openethereum-service
spec:
  #type: NodePort
  selector:
     app: openethereum
  ports:
    - protocol: TCP
      name: eth-tcp
      port: 30303
      targetPort: 30303
      #nodePort: 30303
    - protocol: UDP
      name: eth-udp
      port: 30303
      targetPort: 30303
      #nodePort: 30303
    - protocol: TCP
      name: rpc
      port: 8545
      targetPort: 8545
    - protocol: TCP
      name: websocket
      port: 8546
      targetPort: 8546
First, copy the code listing and save it as openethereum.yaml. Make sure to replace <YOUR_HOME_FOLDER> with your user or the entire path with the path you want the files to be stored.
You can execute the deployment with
kubectl apply -y openethereum.yamlThis will pull the docker image and create a deployment. It will also create a service to expose the needed ports. The client will be executed with the parameters: --unsafe-expose --base-path /home/openethereum/.local/share/openethereum --chain goerli.
--unsafe-expose is needed because every pod will have an own network endpoint within the virtual network of kubernetes. Usually you shouln’t use this option if you run the client directly on your local machine because all clients run on the same host and you don’t want to expose the management port 8545 to another host. But since we are using kubernetes this isn’t a problem because the network will be secured by other methods.
Be carefull to connect to the testnet by using --chain goerli. If you want to connect to the mainnet later just remove those lines.
Make sure everything went well by listing your active pods.
kubectl get pod | grep openethereumThis will return a pod name hopefully with the status Running. Now we have to wait for the synchronization. This will take a couple of hours, maybe days. You can check the current state or errors by examining the log.
kubectl logs <YOUR_POD_NAME>As long as it says something like syncing we have to wait. It will show you the current block it is working on. You can estimate the remaining time by checking out the latest block number on Etherscan for görli, your current block and the blocks processed every second by your client.
After syncing is done the processor activity of your machine should drop to normal. Remember; we don’t want to mine ETH, we just need to examine the Eth1 chain for our validator. One of the big advantages of proof-of-stake.
During the first sync openethereum warps with snapshots to the nearest block that’s a divider by 5000 and starts the normal syncing process. In the background its loads the missed acient blocks. Unfortunatelly we can’t start the beacon chain until everything is fully synced because the beacon node needs to validate all genesis validators for the genesis block. The first validators where created about a month before the genesis block. So all blocks starting from November 2020 are needed.
Installing the beacon node
The next thing would be the beacon node. The beacon node is similar to the Ethereum 1 client. It also examines the blockchain. In this case the beacon chain. Because the old Ethereum chain is still a part of Ethereum 2 the beacon node has also to validate the old chain. This is done via a RPC connection to the Ethereum 1 client. To create a deployment for the beacon node we create a file called prysmbeacon.yaml.
apiVersion: apps/v1
kind: Deployment
metadata:
  name: prysmbeacon-deployment
  labels:
    app: prysmbeacon
spec:
  selector:
    matchLabels:
      app: prysmbeacon
  strategy:
    type: Recreate
  replicas: 1
  template:
    metadata:
      labels:
        app: prysmbeacon
    spec:
      containers:
      - name: prysmbeacon
        image: gcr.io/prysmaticlabs/prysm/beacon-chain:stable
        volumeMounts:
        - name: prysmbeacon
          mountPath: /data
        ports:
        - containerPort: 12000
          protocol: UDP
        - containerPort: 13000
          protocol: TCP
        - containerPort: 4000
          protocol: TCP
        args:
        - --accept-terms-of-use
        - --datadir=/data
        - --rpc-host=0.0.0.0
        - --monitoring-host=0.0.0.0
        #- --p2p-host-ip=127.0.0.1
        - --http-web3provider=http://openethereum-service:8545
        - --pyrmont
      volumes:
      - name: prysmbeacon
        hostPath:
          path: /home/<YOUR_HOME_FOLDER>/.local/share/k8s/eth/testnet/prysm/beacon
---
apiVersion: v1
kind: Service
metadata:
  name: prysmbeacon-service
spec:
  #type: NodePort
  selector:
     app: prysmbeacon
  ports:
    - protocol: TCP
      name: beacon-tcp
      port: 4000
      targetPort: 4000
    - protocol: TCP
      name: beacon2-tcp
      port: 13000
      targetPort: 13000
      #nodePort: 13000
    - protocol: TCP
      name: beacon-udp
      port: 12000
      targetPort: 12000
      #nodePort: 12000
Deploy the beacon node the same way we did with the Ethereum 1 client. Don’t forget to replace <YOUR_HOME_FOLDER> with your actual home folder.
kubectl apply -f prysmvalidator.yamlThe interesting arguments are --http-web3provider=http://openethereum-service:8545 which is the connection to the Ethereum 1 chain and --pyrmont which ensures you are working on the testnet. --accept-terms-of-use is necessary because you don’t have an interactive screen.
Create an Ethereum 2 validator key
Go to the Pyrmont Launch Pad and follow each step. Select openethereum and Prysm as clients. After everything is done you should have uploaded your deposit-data to the website, send 32 Ether to the burning contract and have received a validator keyfile.
Import the validator keystore
With the next step we will import the validator key into our validator directory. Don’t even think about using the docker client for this task. The cli is much faster and easier to use.
First we have to download it.
curl https://raw.githubusercontent.com/prysmaticlabs/prysm/master/prysm.sh --output prysm.sh && chmod +x prysm.shAfter that we can use it to import our validator key.
./prysm.sh validator accounts import --keys-dir=<VALIDATOR_KEY_FOLDER> --pyrmontWe have to enter a new password for the wallet and also the one you used for generating the validator key. Copy the keystore into your share folder.
~/.local/share/k8s/prysm/validator/wallet/direct/accounts/all-accounts.keystore.jsonWe will import the keystore later within the validator. To keep your password save we create a kubernetes secret. Therefore we have to encrypt it as base64.
echo -n "my wallet password" | base64The base64 encryption is not used for security but to avoid problems with the encoding of special characters when importing it into the kubernetes secret.
apiVersion: v1
kind: Secret
metadata:
  name: prysmvalidator-wallet-secret
data:
  wallet-password: <REPLACE_ME>
Replace the secret with your base64 string and save the code listing as prysmvalidator-wallet-secret.yaml. Execute it with kubectl.
kubectl apply -f prysmvalidator-wallet-secret.yamlYou can delete the file afterwards to keep your password save.
Now we have to wait. The validator deposit will take roughly 15 hours. We also have to wait for the beacon chain to finish syncing bevor we can start the validator.
Installing the validator
The last part we need to do is to install the validator. First we create a new file location. Ensure you have the following path ready.
mkdir ~/.local/share/k8s/eth/testnet/prysm/validator/dbapiVersion: apps/v1
kind: Deployment
metadata:
name: prysmvalidator-deployment
labels:
app: prysmvalidator
spec:
selector:
matchLabels:
app: prysmvalidator
strategy:
type: Recreate
replicas: 1
template:
metadata:
labels:
app: prysmvalidator
spec:
containers:
- name: prysmvalidator
image: gcr.io/prysmaticlabs/prysm/validator:stable
volumeMounts:
- name: prysmvalidator
mountPath: /data
- name: prysmvalidator-wallet-secret
mountPath: /var/wallet-secret
readOnly: true
args:
- --accept-terms-of-use
- --beacon-rpc-provider=prysmbeacon-service:4000
- --wallet-dir=/data/wallet
- --datadir=/data/db
- --wallet-password-file=/var/wallet-secret/wallet-password
- --pyrmont
volumes:
- name: prysmvalidator
hostPath:
path: /home/<YOUR_HOME_FOLDER>/.local/share/k8s/prysm/validator
- name: prysmvalidator-wallet-secret
secret:
secretName: prysmvalidator-wallet-secret
Again, we have to replace <YOUR_HOME_FOLDER>. Everything else should be easy to unserstand except for the secret. We load the secret as volume prysmvalidator-wallet-secret into the path /var/wallet-secret which creates a password file. With the parameter --wallet-password-file we tell the validator to read that file as keystore password.
To see if everything is working you should check out the logs of your pod. You can also Monitor your validator at sites like beaconcha.in. Look for your validator public key in the output and search for it on the validator overview.
kubectl logs prysmvalidator-deployment-<YOUR_POD_ID> | grep pubKeyAs soon as the validator is approved it should start generating Ether.
Open discovery ports
This step is not necessary but will help other clients to find you faster, by letting them establish a connection to your host. You may have noticed, that I commented out some nodePorts for the services. You can uncomment them and make them available outside of the kubernetes virtual network. Keep in mind that your node may not have all ports available. In this case simply use other ports. You can find the necessary parameters in the documentation from openethereum or prysm. Don’t route the RPC Ports to the outside world! This could be dangerous. Only route the discovery ports. If you use a router you may also have to forward those ports to your machine.
Because our pods run within a virtual network they don’t know your real ip address. You have to set it manually. You can do this for the openethereum client with the parameter --nat. The beacon chain client can be configured with --p2p-host-ip. Here you can also use --p2p-host-dns if you use a dynamic dns service because of changing ip addresses.
Safe disc space
If you want to safe some disc space you can disable the syncing process of the old blocks for the beacon chain with --disable-sync. With this parameter the beacon chain skip the initial sync and start normal syncing right away. Make sure to do your deposit after that.
Unfortunately the ethereum 1 chain needs a lot of space. You need at least a 1TB SSD drive to be able to create a Eth1 client supported beacon chain. Because the beacon chain needs some ancient blocks for the genesis validation it is not possible to deactivate the genesis blocks on openethereum.
One trick would be to do the initial sync with an public chain provider like Alchemy . They offer free quotas that should be enough for the initial syncing. After that you could return to your own openethereum client with no ancient blocks. To do so you have to add the parameter --no-ancient-blocks. But be warned. This is absolutely not recommended.